I recently received my Radxa Rock 5B SBC and intended to put it in place as my primary workstation at home. In order to use it as my primary workstation I had a few major required pieces of software:
- Chrome (or at least the ability to sync with Chrome for bookmarks, history and the useful “send to devices” feature that Chrome on Android has)
- VSCode – For writing code of course!
- Cura & Blender – For working with STL files (Blender) and slicing for my 3D printer (Cura)
- Libre Office – For some basic MS Office document compatibility
- Docker – For working with and testing packages
- Remmina (for use as an RDP client) – To access my VM’s and run any Windows only software needed
Feel free to take a look at my Radxa Rock 5B SBC breakdown posts. For more information on this octa-core beast!
Everything on this list is available on the Ubuntu 20.04.5 LTS image that is available from Radxa with the exception of Chrome. For some reason Google has opted not to release an ARM version of Chrome for Linux. Google supports Windows 7+, Mac (including Mac’s running M1 ARM chips), and amd64 versions of Ubuntu, Debian, openSUSE and Fedora. (Google official supported page here)
Without an official Chrome release the next best fallback is Chromium. Success! Chromium is available as a snap package and works on ARM! I can also see the versions are close to in sync. On my Windows 11 PC Chrome is currently at 108.0.5359.125, and Chromium is running 108.0.5359.98. Close enough. Let’s install:
snap install chromiumNOTE: We are installing via a SNAP rather than from APT since the APT package is no longer being maintained. Be sure to use the SNAP package.
Great! Chromium installs and launches. But…. we have a problem. Google disable the ability for non-Chrome browsers to sync with Google’s official Chrome API’s. So, what are the choices? There are no officially available browsers that can run on an ARM desktop that can sync with Chrome.

After a web search, I found this: https://www.chromium.org/developers/how-tos/api-keys/
This page is published on the chromium.org website but is wholly unclear and incomplete. After searching for answers across many days, I landed here: https://gist.github.com/cvan/44a6d60457b20133191bd7b104f9dcc4?permalink_comment_id=3692715
The comment by gsitreble2019 ended up solving the issue for me, however these instructions were ALSO unclear and also included instructions if you were running Chromium installed via APT rather than SNAP. After much searching and digging into how SNAP is structured, I came up with my own instructions on how to make Chromium sync with Chrome.
The Steps for Chromium Sync with Chrome
For those that want to jump through quickly and are power users, the steps are listed below. Each step will be broken out in more detail with screenshots next.
- Install Chromium snap package (Jump to the detailed steps)
- Launch Chromium, browse to any google service and log in with the account you want to sync with
- Join these TWO Google Groups (the Chromium page only lists 1, but BOTH are required, Jump to the detailed steps):
- https://groups.google.com/u/0/a/chromium.org/g/google-browser-signin-testaccounts
- https://groups.google.com/a/chromium.org/forum/?fromgroups#!forum/chromium-dev
- NOTE: You can set the subscription to no email, but you must join the groups to get access to the Google Sync API
- Open the Google Cloud Console and enable the Chrome Sync API (Jump to the detailed steps)(https://console.cloud.google.com/apis/api/chromesync.googleapis.com/quotas?project=chromium-sync-372423)
- NOTE: If you don’t have a project, you’ll need to create one. See the details below for a step by step
- I also enabled the Safe Browsing API, but is doesn’t appear to be required (https://console.cloud.google.com/apis/api/safebrowsing.googleapis.com/metrics?project=chromium-sync-372423).
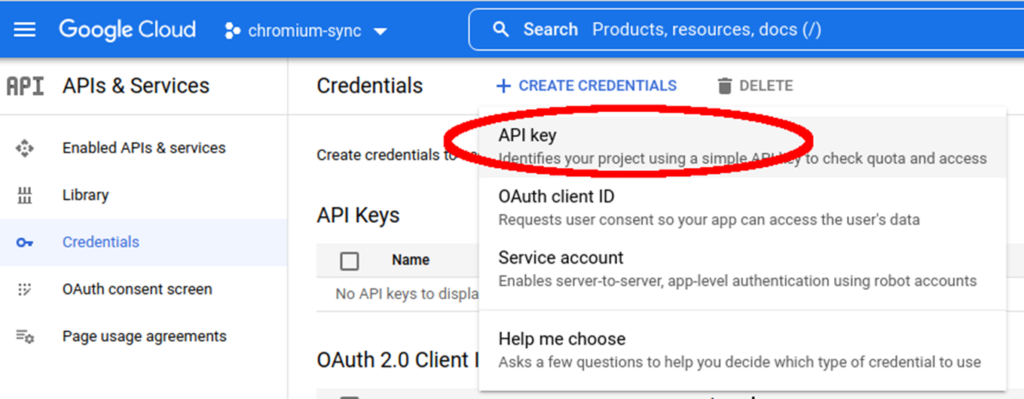
- Create your API Key as well as your OAuth client ID and secret (Jump to the detailed steps)
- Configure Chromium to use your API Key and OAuth client ID and secret. (Jump to the detailed steps)
- You can do this by running the following commands to create environment variables, then run chromium from the command line:
export GOOGLE_DEFAULT_CLIENT_SECRET=...export GOOGLE_DEFAULT_CLIENT_ID=...export GOOGLE_API_KEY=...
- Edit your systemd environment.d configuration so you can run Chromium from Ubuntu’s task bar or apps menu:
- Create the following folder if it doesn’t exist:
mkdir -p ~/.config/environment.d
- Create a file named
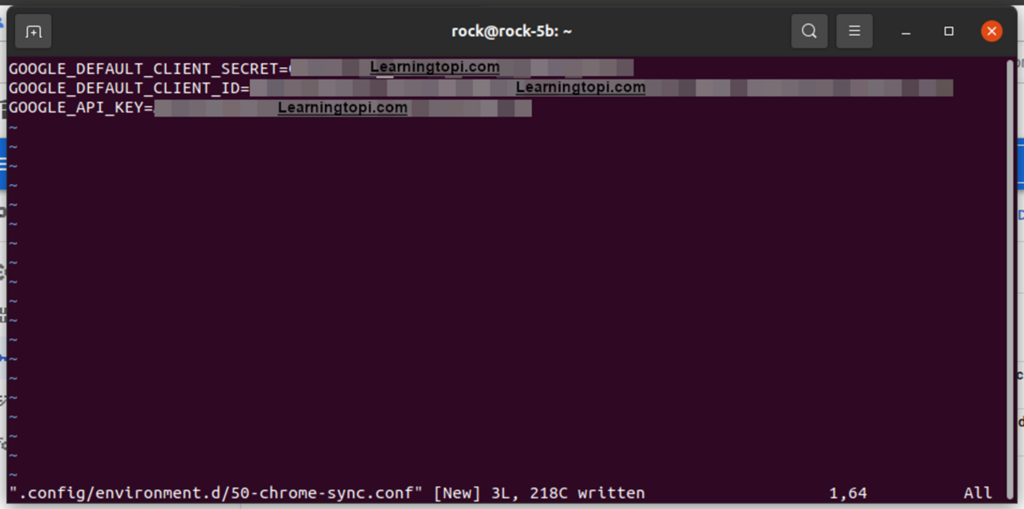
chrome-sync.confin this folder (name can be whatever you want if it ends with .conf). Add the 3 environment variables from above, but exclude the “export” statement:GOOGLE_DEFAULT_CLIENT_SECRET=...GOOGLE_DEFAULT_CLIENT_ID=...GOOGLE_API_KEY=...
- Log out and back in again to refresh your environment.
- Create the following folder if it doesn’t exist:
- You can do this by running the following commands to create environment variables, then run chromium from the command line:
- If you now see the sync option, you succeeded! Hit the button to turn on sync and supply your credentials.
- If it doesn’t work, make sure you joined both Google Groups in step 3. If you are positive you got everything, wait a few hours and try again. There can be a delay between getting all the API access setup and having it work. If it STILL doesn’t work, from chromium from a terminal window and check the error. (Jump to troubleshooting steps and options)
Now for the detailed steps with screenshots where applicable.
Install Chromium Snap
This should be a quick, however if you are using an Ubuntu server distribution from Radxa or another SBC provider, it may not include the snap store. Your choices are:
- Install the snap from the CLI using:
sudo snap install chromium - Install the Snap Store from the CLI:
sudo snap install, then use the “Ubuntu Software” app to install Chromium

Chromium will now be available in the app menu.
Join BOTH Google Groups
Join both of the following Google Groups:
https://groups.google.com/u/0/a/chromium.org/g/google-browser-signin-testaccounts
https://groups.google.com/a/chromium.org/forum/?fromgroups#!forum/chromium-dev
When you select the links (assuming you are logged into your Google account), you’ll have an option to join the group. Make sure you link it to your Google account. You can also select “Don’t send email updates” so you don’t get inundated with developer emails you probably aren’t interested in (although I did find a few interesting ones regarding the Google Sync issue).

After you join the “Google Browser Sign-in test account” group, you’ll see a message that “you don’t have permission to access this content”. This is NOT an issue. If you have joined the group, “Chrome Sync API” will be available in the next step.
Enable Chrome Sync API for Chromium Sync
Browse to the Google Cloud Console (https://console.cloud.google.com/) for all the following steps. Be sure you are logged in with the same Google account that you joined the groups with from the previous step. This also should be the account that you intend to sync Chromium with.
First select a project. If you are new here, you’ll need to create a project. If you have a project already, you can simply add the API’s to your existing project.
From the Select Project drop down, create a “New Project”

I called mine “chromium-sync”, but you can use whatever naming convention you would like

Make sure the project is selected before moving on to the API’s:

From the hamburger menu, open the “APIs and Services” menu and select the “Enable APIs and Services” button. (You can also select the library from the APIs and Services menu, or search for the API’s using the search box at the top of the page. The interface may change over time, so check around if the button isn’t present)

Search for, then enable the “Chrome Sync API”. Additionally you can add the “Safe Browsing API”, but not technically required. If you can’t find the Chrome Sync API, go back to the last step and make sure you are in the Google Groups.


After enabling the API, it will be listed on the API’s and Services menu under the enabled API’s.

Create API Key and OAuth
Browse to the Google Cloud Console (https://console.cloud.google.com/) for all the following steps. Be sure you are logged in with the same Google account that you joined the groups with from the previous step. This also should be the account that you intend to sync Chromium with.
Make sure that the project you created in the last step is selected:

OAuth Consent Sreen
On the APIs and Services page, select Credentials. Unless you have been here before, there should be no API Keys or OAuth 2.0 Client IDs listed. Click the button to configure the consent screen.

The consent screen is intended for your clients to approve access to their google account from your app, but we are just using this for personal, so what you put in here isn’t important since we are not publishing this service.
External is the only option, sad since we aren’t ever intending to publish this.

You’ll need to provide an App name (I was creative and called it “chrome-sync”), support email (I just used my Google account email) and developer email (Google account again). Everything else is optional and can be left blank


You don’t need to fill in any scopes. Just leave it blank and continue

Also don’t need test users, just save and continue

You should now see a summary of your app

Next is creating the actual keys. The API Key and OAuth can be created in any order.
Create an API Key
Make sure that the project you created in the last step is selected:

Browse to the Google Cloud Console (https://console.cloud.google.com/) for all the following steps. Be sure you are logged in with the same Google account that you joined the groups with from the previous step. This also should be the account that you intend to sync Chromium with.

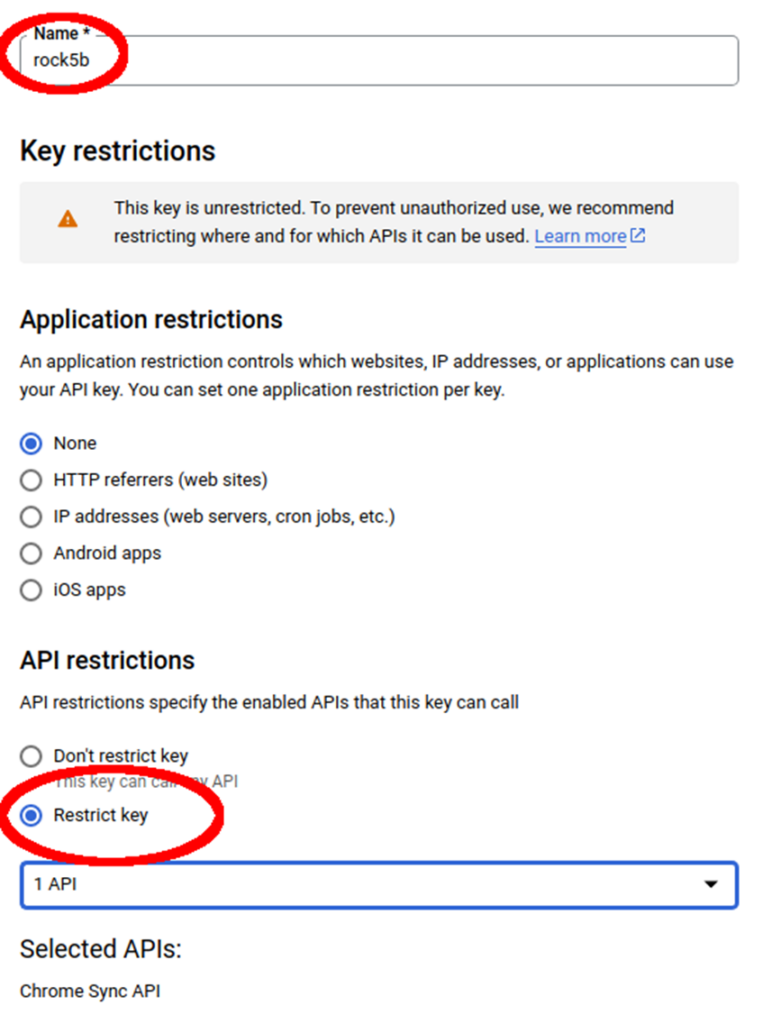
After creating, you’ll get a randomly generated key in a pop up. Copy this string (you can get it again later if you need it from the Google Cloud Console). The warning at the bottom is that the key is unrestricted, from time spent designing and deploying networks I try to follow a least trusted model so we will fix this next. Click “Edit API key” now, or you can come back and set the restrictions later if you prefer to make sure things are working first.

I like to name anything that can be named, so give your API key a name that will mean something to you. Where is this API key used? On my Rock5b (hence the name). I restricted to the Chrome Sync API, then added the safe Browsing API later.

Create OAuth Client ID and Secret
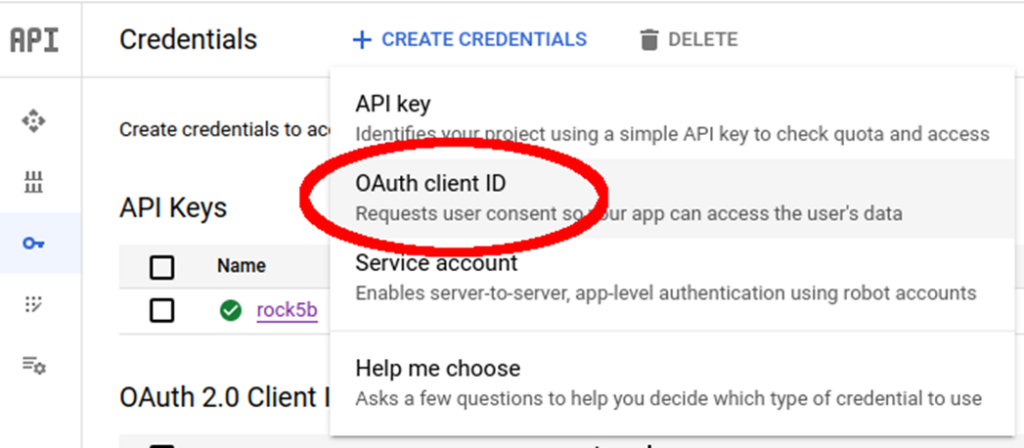
Next, from the Credentials page, we need to add an OAuth client

You’ll be asked for a Name again (rock5b here again for my specific system) and an application type. If you select “Web Application”, “Android”, “iOS”, “Chrome App” or “Universal Windows Platform (UWP)” you will be asked for a lot more information. “Desktop App” and “TVs and Limited Input devices” both just allow you to create with only a name. I selected the TV option just because others in the threads I found said it worked.

After creating, you’ll get your randomly generated Client Id and Client Secret. Copy these down where you saved your API key. You’ll need them later (you can come back and get the ID and secret if you lose them though, so not the end of the world if you miss it).

Configure Chromium to use your API Key and OAuth Client
Now that we have our API Key and OAuth client ID and secret, we need to get that to Chromium somehow. There are multiple options you’ll find on the web for this:
- Compile it into Chromium – Not an option, this is a precompiled Snap package
- Pass it as CLI parameters – Maybe, but I was not successful in trying to edit the snap launch script, so seems like a lot of work. Let’s look for something simpler.
- Use environment variables – Yes! Per user settings (rather than global settings that I’ve seen in a lot of posts) and will survive across snap package updates!
In an Ubuntu terminal window, you can run the following:
export GOOGLE_DEFAULT_CLIENT_SECRET=...
export GOOGLE_DEFAULT_CLIENT_ID=...
export GOOGLE_API_KEY=...
chromium
This will set the 3 environment variables required and launch Chromium (since we are launching from the CLI, we will also get some potentially useful log messages).
Ok great! This Works! I get the option to enable sync!

But… if I launch Chromium from the App menu, it won’t launch with these environment variables, and I lose the sync option

After futzing around with .bashrc and .profile files, I discovered that the display manager apparently doesn’t load these anymore. So…. after yet more searching (from Google of course) I discovered that systemd uses environment.d to configure environment variables. There is a somewhat useful description here: (https://freedesktop.org/software/systemd/man/environment.d.html) but I won’tpretend to fully understand the environment setup process. All I can tell you is creating a directory “~/.config/environment.d”, then creating a file “50-chrome-sync.conf” (any name that ends in .conf will work) is the key to making it all work. The file should include the 3 environment variables (with no export statement):

After saving this file, you WILL need to log out and back in. Reboot if you want to be sure. Now launching Chromium from the Apps menu gives the Sync option!

Last step is to sign into Chrome with your email and password (make sure you are using the same email that you used to sign up to the Google Groups as well as to enable the API’s. If not, this isn’t going to work and you’ll need to start over).


From here, you should get your bookmarks synced, saved passwords, and now have the ability to send web pages between devices!
What to do if it doesn’t work?
If things aren’t working, first, run Chromium from a terminal window and check what error you are getting. If you get something like the following:
[(ERROR:turn_sync_on_helper.cc(240)] Cannot turn Sync On for invalid account.

Here is what you can do:
- WAIT! Depending on how quick you got through these steps, everything may not yet be synced on Google’s side. Give it at LEAST 30 minutes, but some posts I’ve seen said it can potentially take hours. Give it some time before you give up.
- Make sure the Chrome Sync API is enabled in the Google Cloud Console (https://console.cloud.google.com/).
- MAKE SURE YOU ARE IN BOTH GOOGLE GROUPS! The Dev group (https://groups.google.com/a/chromium.org/forum/?fromgroups#!forum/chromium-dev) gives you the ability to add the Chrome Sync API, but it bizarrely doesn’t give you the ability to use it. Join the Google Browser Sign-in Test Accounts group (https://groups.google.com/u/0/a/chromium.org/g/google-browser-signin-testaccounts) as well.
- Make sure your environment variables are working! If you don’t even get the option to Sync, then it is highly likely that the environment variables aren’t working. From a terminal window run “printenv | grep -i google” and make sure all 3 are present and correct. If you setup the environment.d file and you aren’t seeing these try rebooting. If you still don’t see it check that your file name ends with .conf and there isn’t a misspelling in the folder path or file name.
- Google to see if someone else has written up instructions like these that are more specific to your use case. This was tested on a Radxa Rock 5B running Ubuntu 20.04 LTS with Chromium installed via Snap.
- There is the ever present possibility that Google may change this process, or just shut down this access too. I’ll update if I find a change to the process, but if Google ever decides to release an official Chrome package that works on Linux ARM64 I’ll ditch this convoluted process in a heartbeat!
Thanks for reading! Feel free to post comments below if this was helpful. Also be sure to check our other articles for Python libraries or breakdowns of SBC’s.


Hey quick question as I have two google account, and with sync enabled, everytime I relaunch chromium I need to relogin to the second account any idea on how to “remember” the second account ?
That I have not tried. I have a 2nd account I use, I’ll see if I can replicate. I assume we are only attempting to sync with one, but have access to the other on google services correct?
Thank you. This allows me to run FreeBSD; having no access to google sync was a bit of a deal breaker.
i need it for mac
The logical setup should be the same, however there are Mac versions of Chrome available that will allow sync. I only use Chromium on Linux ARM64 based systems where Google does not have an installer.
I tried using the file I created for /.config/environment.d/50-chrome-sync.conf but it would not work with Ubuntu Mate 22.04.2. The final solution, which is working, was making an executable shell file and placing as the command on the chromium icon. Now it works and I only had to login once.
The export and chromium is on one line for it to function. This functions using the shell begining script. Also, the file has to be made executable by my user and be the owner for it work.
Good addition! Unfortunate that the environment.d settings didn’t work. My original setup was running Ubuntu 20.04 so there may be some differences. I’ll re-run through on as 22.04 and 23.04 when I have some time to look at what has changed. I like the shell script option as well!
Thanks!
IT WORKS!!! Thank you 🙂