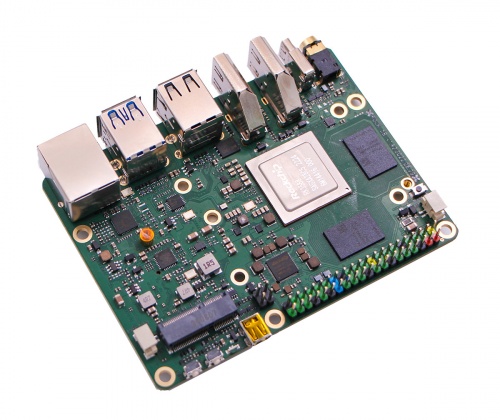
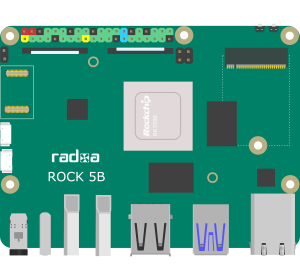
If you are looking for the results of the sbc_gpio tests, please check out our sbc_gpio Pi 4B vs Rock 5B comparison.
Configuring the Radxa Rock 5B for our sbc_gpio test require 1x I2C, 2x SPI, 1x UART and 2x IR (1 Tx and 1 Rx). All the configuration will need to be done directly in the /boot/config.txt file. Radxa does not have a tool similar to raspi-config on the Raspberry Pi.
For reference the IR receiver we are using is a TSOP38238 receiver diode. You can find them here: https://amzn.to/3PjZm0x. We are also using IR LED’s that you can find here: https://amzn.to/3XdDlCw
We are an Amazon affiliate and may receive some compensation from any products purchased. Affiliations and ads are how we can provide the content that we do!
NOTE: After any changes to the
/boot/config.txtfile, you MUST run"sudo update_extlinux.sh"to update the/boot/extlinux/extlinux.conffile. If you don’t run theupdate_extlinux.shscript the changes to the/boot/config.txtfile won’t ever be applied.
I2C, SPI and UART Overlays
The I2C, SPI and UART overlays are easily configured using the /boot/config.txt file. The following lines will add overlays for I2C7, SPI0, SPI1 and UART2:
dtoverlay=rk3588-i2c7-m3
dtoverlay=rk3588-spi0-m2-cs0-spidev
dtoverlay=rk3588-spi1-m1-cs0-spidev
dtoverlay=rk3588-urat2-m0
NOTE: After any changes to the
/boot/config.txtfile, you MUST run"sudo update_extlinux.sh"to update the/boot/extlinux/extlinux.conffile. If you don’t run theupdate_extlinux.shscript the changes to the/boot/config.txtfile won’t ever be applied.
This gets everything except the infrared quickly and easily. Of course IR is where we run into an issue…
Infrared Transmit and Receive
There are two issues with setting up IR on the Rock 5B:
- The stock Radxa kernel (5.10.110) does not have any IR Tx or Rx modules compiled in it
- There is no overlay for IR Tx or Rx compiled and available
Before we can run an infrared tests, we will need to fix both of these issues.
Compile the kernel with IR modules
First step is we need to recompile the kernel. Radxa has decent instructions available on their website: https://wiki.radxa.com/Rock5/guide/build-kernel-on-5b
I put in a merge request to the Radxa kernel to enable IR modules in future kernel builds (https://github.com/radxa/kernel/pull/128). Before you recompile the kernel, check to see if the module is included for the Tx and Rx bit-banging driver. Run the following commands:
sudo modinfo gpio-ir-tx
sudo modinfo gpio-ir-recv
The Radxa kernel build instructions from the guide above assumes that you are compiling on the Rock 5B itself. It you are intending to compile on a different system, there are more steps that need to be performed to setup cross platform compilation.
Here is a summary of the steps (from the Radxa guide):
Install Prerequisites
sudo apt-get update
 && sudo apt-get install -y git  device-tree-compiler libncurses5 libncurses5-dev build-essential libssl-dev mtools bc python dosfstools bison flex rsync u-boot-tools make
Clone the Source Code
mkdir ~/rk3588-sdk && cd ~/rk3588-sdk
git clone -b linux-5.10-gen-rkr3.4 https://github.com/radxa/kernel.git
git clone -b master https://github.com/radxa/rkbin.git
git clone -b debian https://github.com/radxa/build.git
You can of course clone to a different folder. The examples from Radxa will assume that all the code is in the ~/rk3588-sdk folder.
Update the Kernel Config
The next step is to update the kernel config to include the IR modules.
cd ~/rk3588-sdk/kernel
make rockchip_linux_defconfig
make menuconfig
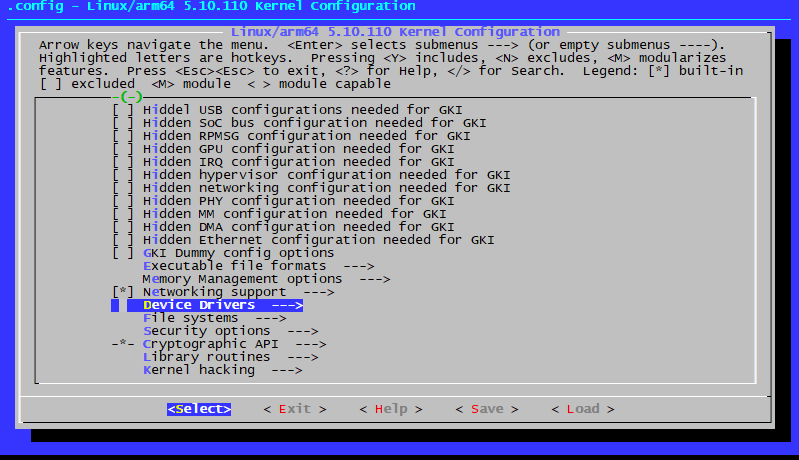
This will load the text menu configuration utility for the kernel. On the main menu scroll down to the “Device Drivers” section and hit ENTER to select it (the —> at the end of the line indicates that there is a submenu).
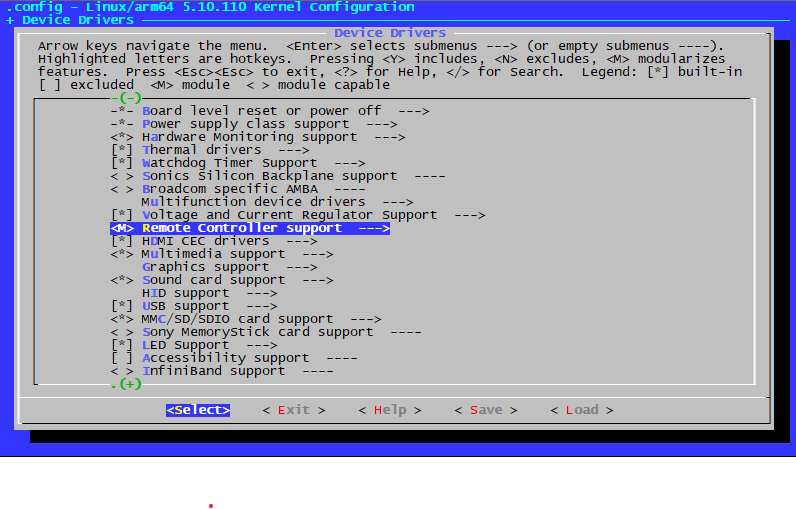
On the Device Drivers page, scroll down until you reach “Remote Controller support”. The left column should show a “[ ]” which signifies that it is not currently included in the kernel. Hit “M” or SPACE until it changes to a “<M>”. Then hit ENTER to enter the “Remote Controller Support” sub-menu.
Here we need to enable the “LIRC user interface” by hitting the SPACEBAR. After this is set to “[*]”, move down to the “Remote Controller Decoders” and hit SPACE again. When the 1st column changes to “[*]” the submenu for the decoders will be activated. Just select them all by using the SPACE or “M” key. Use the right arrow key to select “EXIT” from the list of options at the bottom to go back up a menu.
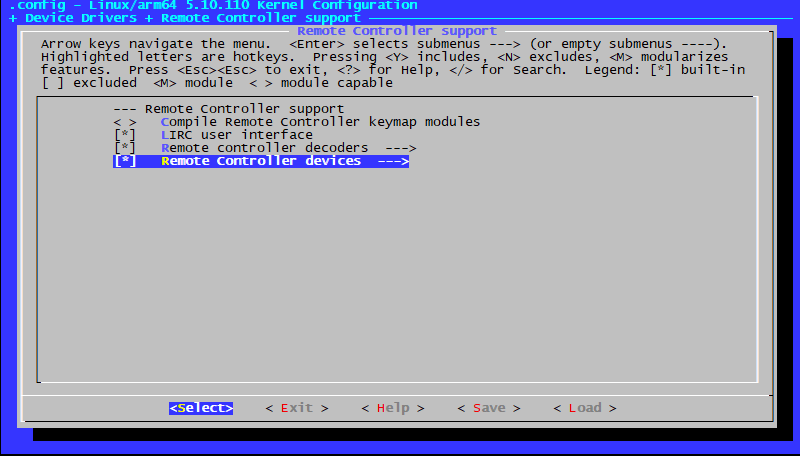
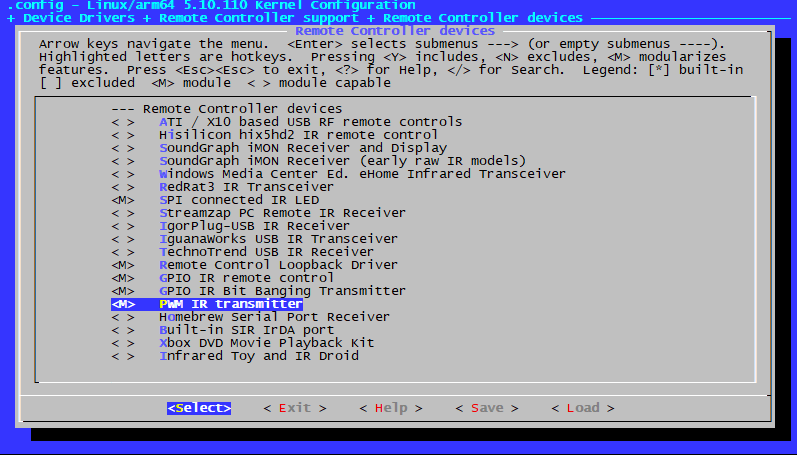
Select “Remote Controller Devices” and hit SPACE. Once the 1st column changes to “[*]” hit enter to enter the menu. From here select at a minimum the “GPIO IR remote control” and “GPIO IR Bit Banging Transmitter”. I additionally added the “SPI connected IR LED” and “PWM IR transmitter” for future use.
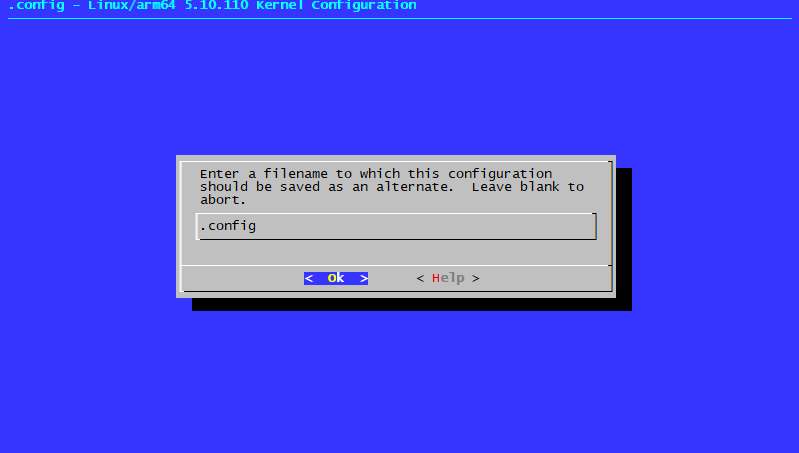
Once the updates have been made, use the right arrow to move over to “Save” on the bottom list, and save the config as “.config” (this is the default config file).
Compile the Kernel and Install It
After you save, exit out of all the menus until you are back at the command line. Next run the following commands to prep the new configuration for the kernel build.
make savedefconfig
cp defconfig arch/arm64/configs/rockchip_linux_defconfig
Next (but not last), we need to build the kernel. This will take some time to complete:
cd ~/rk3588-sdk
./build/mk-kernel.sh rk3588-rock-5b
After you finish the kernel build, verify that the files are present:
$ ls out/kernel/
Image  rk3588-rock-5b.dtb
The last step is to convert your new kernel image into a “deb” package that you can install in Debian, Ubuntu, or any other Debian based system that you are running. You will need to add a release number that will be appended to the kernel. This will append a value after 5.10.110-” in the filename. For differentiation, the lastest build I have from Radxa’s APT repo is 37. I typically start at 1000 to make it easy to identify.
./build/pack-kernel.sh -d rockchip_linux_defconfig -r 1000
Once the pack-kernel script is complete, you will now have a series of packages ready to be installed:
$ ls out/packages/
linux-5.10.110-99-rockchip-g9fd61a9a9912_5.10.110-1000-rockchip_arm64.changes
linux-headers-5.10.110-99-rockchip-g9fd61a9a9912_5.10.110-1000-rockchip_arm64.deb
linux-image-5.10.110-99-rockchip-g9fd61a9a9912-dbg_5.10.110-1000-rockchip_arm64.deb
linux-image-5.10.110-99-rockchip-g9fd61a9a9912_5.10.110-1000-rockchip_arm64.deb
linux-libc-dev_5.10.110-1000-rockchip_arm64.deb
You will need to install the “image” and “headers” package. There are two packages named “linux-image”, you will only need the one that DOES NOT include the “-dbg” text. This copy of the kernel includes debugging components that I’m sure you won’t require if you are reading this post! Just install the images using “dpkg”:
sudo dpkg -i out/packages/linux-image-5.10.110-99-rockchip-g9fd61a9a9912_5.10.110-1000-rockchip_arm64.deb
sudo dpkg -i out/packages/linux-headers-5.10.110-99-rockchip-g9fd61a9a9912_5.10.110-1000-rockchip_arm64.deb
Check Your Kernel
If you check the /boot/extlinux/extlinux.conf file, you should see your new kernel build listed as the first image. Reboot and verify with uname -a! If you see your specific kernel build number then you are done and ready to move on to overlays!
Create the Overlays
First off, what is an overlay? For reference we are in fact refering to a Device Tree Overlay. A device tree overlay can performs two functions for us:
1st – The overlay is read during the boot process and is used to enable parts of the hardware that are not enabled by default. An example here is enabling the UART, SPI or I2C devices that we did previously. These use the same pins as regular GPIO’s and the hardware has to be told to enable the UART functions in the hardware chip.
2nd – The overlay associates a kernel driver with a hardware device. For the case of infrared, we need to tell the kernel what GPIO pin we want, how to configure that pin (i.e. pull up or down) and associate it with a driver.
Overlay Caveats to keep in mind
In order to run our IR tests, we will need to create 2 overlays, one for the transmit LED, and one for the receiver, but first a few notes:
- The overlay is in a DTS file, but all DTS files must be compiled to DTB or DTBO files for use during the boot process. (Think of this like a C file that needs to be compiled to a binary.)
- The compiled DTBO file needs to be accessible VERY early in the boot process, so they must all be located in the
/bootdir. - There are different mechanisms used by different vendors to load DTBO overlay files. The Rock 5B uses uboot and extlinux to apply device tree overlays and start the Linux kernel. With Raspberry Pi OS, the config.txt file is loaded and parsed to get overlay parameters (i.e. which GPIO to use). Uboot does not allow this, so this means we need to create a compiled DTBO file with the exact parameters (including GPIO pin).
- Radxa’s
update_extlinush.shfile (remember you have to run this after/boot/config.txt changes) wipes and reloads the DTBO overlay files in the/boot/dtbs directory.
IR Rx Overlay
The IR Rx overlay will need to use the gpio-ir-recv driver we compiled into the kernel previously. We will also need to assign the GPIO pin we want to use. For our example we will be using pin 3A3 (gpio chip 3, pin 11). The TSOP38238 IR sensor is active low (as opposed to high), so we also need to let the kernel know this.
Here is the DTS file contents. We will need to save this file somewhere (doesn’t need to be on the boot partition) so we can compile it into a DTBO. For reference, we will use the name rk3588-ir-rx.dts for consistency with the other rk3588 overlays.
// Definitions for ir-gpio-recv module
/dts-v1/;
/plugin/;

#include "dt-bindings/gpio/gpio.h"

/ {

        fragment@0 {
                target-path = "/";
                __overlay__ {
                        gpio_ir_recv: gpio_ir_recv {
                                compatible = "gpio-ir-receiver";
                                status = "okay";
                                gpios = <&gpio3 11 GPIO_ACTIVE_LOW>;
                                pinctrl-names = "default";
                        };
                };
        };
};
Once we have the DTS file defined, we can compile it to a DTBO:
dtc -i dts -O dtb rk3588-ir-rx.dts rk3588-ir-rx.dtboIR Tx Overlay
The IR Tx overlay will need to use the gpio-ir-tx driver we compiled into the kernel previously. We will also need to assign the GPIO pin we want to use. For our example we will be using pin 3A2 (gpio chip 3, pin 10).
Here is the DTS file contents. We will need to save this file somewhere (doesn’t need to be on the boot partition) so we can compile it into a DTBO. For reference, we will use the name rk3588-ir-tx.dts for consistency with the other rk3588 overlays.
// Definitions for ir-gpio-tx module
/dts-v1/;
/plugin/;

/ {

        fragment@0 {
                target-path = "/";
                __overlay__ {
                        gpio_ir_tx {
                                compatible = "gpio-ir-tx";
                                status = "okay";
                                gpios = <&gpio3 10 0>;
                                pinctrl-names = "default";
                        };
                };
        };
};
Once we have the DTS file defined, we can compile it to a DTBO:
dtc -i dts -O dtb rk3588-ir-tx.dts rk3588-ir-tx.dtboApplying your Overlay at Boot
Now that we have our DTBO files, we need to configure the system to load them on boot. The update_extlinux.sh script clears all files in the /boot/dtbs folder and reloads from /usr/lib/linux-image-*** so we can’t put the files here. We will create a new folder for our DTBO files.
sudo mkdir /boot/custom_dtbs
sudo cp rk3588-ir-tx.dtbo /boot/custom_dtbs
sudo cp rk3588-ir-rx.dtbo /boot/custom_dtbs
This will put our DTBO files where the kernel can get them during the initialization process. The last step is adding theoverlays into the /boot/extlinux/extlinux.conf file. Here we need to add our overlays to the fdtoverlays line under the kernel. If the line already exists (like shown here with the uart7 overlay), just add a space and the new overlay. If there is no fdtoverlay line, add one after the devicetreedir and before the append lines.
NOTE: There will likely be multiple kernels listed. The system will boot the first so technically you only need to add to the
fdtoverlayon the first kernel. For consistency with theupdate_extlinux.shscript though I add mine to all the kernels.The path in the extlinux.conf file may appear odd. At this point only the boot partition is loaded, and it is loaded as the root partition. So make sure your path is “/custom_dtbs/…” and not “/boot/custom_dtbs/…”.
label kernel-5.10.110-2002-rockchip-g76d0450ea961
    kernel /vmlinuz-5.10.110-2002-rockchip-g76d0450ea961
    initrd /initrd.img-5.10.110-2002-rockchip-g76d0450ea961
    devicetreedir /dtbs/5.10.110-2002-rockchip-g76d0450ea961
    fdtoverlays  /dtbs/5.10.110-2002-rockchip-g76d0450ea961/rockchip/overlay/rk3588-uart7-m2.dtbo /custom_dtbs/rk3588-ir-tx.dtbo /custom_dtbs/rk3588-ir-rx.dtbo
    append   root=UUID=e29639d9-0c16-4501-8e64-50995cc715e5 earlycon=uart8250,mmio32,0xfeb50000 console=ttyFIQ0 console=tty1 consoleblank=0 loglevel=0 panic=10 rootwait rw init=/sbin/init rootfstype=ext4 cgroup_enable=cpuset cgroup_memory=1 cgroup_enable=memory swapaccount=1 irqchip.gicv3_pseudo_nmi=0 switolb=1 coherent_pool=2M
That it! Just reboot to load the overlays. You can confirm they are loaded by running dmesg | less and searching for “gpio-ir-” or “lirc”. (LIRC setup will be reflected in the sbc_gpio test since it is common setup for all systems.)
CAUTION!! We manually edited the /boot/extlinux/extlinux.conf file. The next time you run the udpate_extlinux.sh script your changes will be lost! This ALSO includes any kernel update that may be installed as this script is a triggered action.
I am working on some alternative methodsd that can help with this, but it isn’t ready for prime time yet.
Summary
What we saw here is that setting up the Rock 5B is easy as long as you are using one of the predefined overlays. Moving off the defined list of overlays into infrared we had to not only create our own overlay but also recompile the kernel to include the drivers we needed. I fully expect to run into similar issues with drivers based on how the kernel is configured. It appears that the decision was to minimize size rather than include the maximum number of modules.
If you came here from our sbc_gpio test result page, feel free to jump back over to the results!
